Every business or website owner understands the importance of accurate data when making business decisions. Tracking the views of each page on your website is one of these metrics that can provide invaluable insight into your potential customers and performance of your website, products, services etc. On a standard website, tracking pageviews is a simple process – you just add your Google Analytics tracking code to every page on your site and every time a visitor clicks through to a new page, this data is pulled through to your reports. Easy!
Single Page Application (SPA)
However, if your website or web app is a Single Page Application (SPA) – meaning that all of the resources are loaded on the first page load, and subsequent interaction causes additional content to be loaded dynamically – then the default Google Analytics tag will only run once, no matter how many ‘pages’ a visitor views. This is because the snippet code runs when a page is loaded, and on a SPA, the dynamic content loading means that the site does not complete full page reloads.
Fortunately, there are several ways to implement tracking so that we can record and report on these ‘virtual’ pageviews. In this blog, we will be outlining how to set up pageview tracking for SPAs using the History Change Trigger in Google Tag Manager. This is one of the more straightforward ways of setting up SPA pageviews and has the benefit of not requiring input from developers (who we all know are often extremely busy!).
Follow the steps below to learn how to set up pageview tracking on a Single Page Application:
1. Set up Google Tag Manager on your site
- If you haven’t already got Google Tag Manager set up for your site, follow Google’s guide to set up a container and install it on your site.
- Once set up, integrate Google Analytics by using your ID to set up a Google Analytics settings variable.
2. Check that your site is a Single Page Application
- Start Google Tag Manager Preview and Debug mode. If your site is a SPA, when you navigate from one page to another, the debugger should not disappear and reappear (reload). Instead, the Preview pane will remain and continue to track events and interactions but will not track pageviews.
- Check also that the page URL changes when you navigate from one page to another as this is required for the History Change trigger method for tracking outlined in this article.
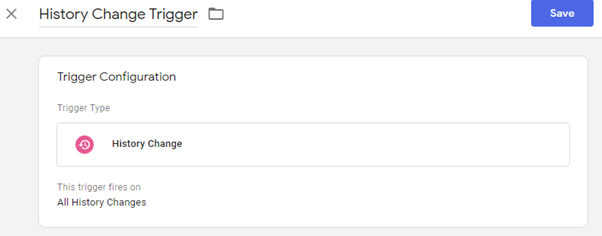
3. Set up a History Change trigger
- In Google Tag Manager, go to Triggers and click to add a new trigger.
- Click on Trigger Configuration and from the list of trigger types, choose History Change (listed under Other).
- Name this trigger and click Save.
4. Use Preview and Debug mode to check your History Change trigger is working
- In the top-right corner of Google Tag Manager, click Preview to launch the Preview and Debug mode.
- Open your site in another tab and you should see the Tag Manager Preview and Debug pane open.
- Navigate to a new page on your site and check that a History event is showing in the left-hand list every time you change page.
- If you are interested in adding additional tracking after page views, you may need to know what data the History variables return. To do this, click on one of the History events in the Debug console, and then on the Variables tab. This will require the History Variables to have been configured in your Google Tag Manager account.

5. Create a Pageview tag and add triggers
- Go to Tags in your Google Tag Manager workspace and create a new tag, ensuring you give it a useful name, like Pageviews.
- Click on Tag Configuration and select Google Analytics: Universal Analytics as your tag type.
- Keep the Track Type as Page View and set your Google Analytics Settings to your Google Analytics settings variable that you set up in Step 1.
- Click on Triggering and select the History Change trigger that you set up in Step 3. Then click on the + in Triggering to add an additional trigger. You will want to add the All Pages Pageview trigger to ensure that your tag tracks the initial page that loads as well as the subsequent (virtual) pageviews.
- Save your tag.

6. Test your Pageview tracking using Tag Manager Debug mode and Google Analytics Real-time
- In Google Tag Manager, Refresh the Preview and Debug mode.
- On your site, refresh the page. The pageview tag should be fired on the Container Loaded event, and then as you navigate to other pages on the site, the pageview tag should be fired on the History events that occur when you change page.
- Open Google Analytics and navigate to the Real-time section in the left-hand sidebar. Under Content, you should see the pages you are clicking on in your site appearing, with one pageview being recorded for each time you click through to a page.

7. Publish your Google Tag Manager container
In Google Tag Manager, click Submit in the top right hand corner of the screen. Your tags and triggers will begin firing and pulling through to your Google Analytics account once you have published your container changes.

The method outlined above is one of the ways to set up of Pageview tracking on a Single Page Application using the History Change trigger in Google Tag Manager. All sites are built differently, and the method above will not work for all sites, however, it can be customised for different site builds and requirements. There are also several other ways of tracking virtual pageviews on SPAs that do not use the history change trigger, but these often rely on input from developers.
We hope that you found this blog useful in setting up Pageview tracking on your SPA.
If you need advice or assistance adding tracking to your Single Page Application, contact the experts at Varn and find out more about what we do.

Optimising your online presence can be a challenge, made harder by trying to choose the right SEO agency for you. All SEO Agencies promise higher rankings and more traffic for your site, so how can you be sure you are hiring the best, the one that will be able to deliver on that promise and more?
There are no professional accreditations, no formal qualifications for SEO. But there are things you can do to make sure you are hiring a great SEO Agency to work with you.
Google has some great advice how to find the best agency for your business and you can read more about it here.
We are based near Bristol in the UK so if you ever want to meet the team at Varn we would love to hear from you and can help your website win rankings and beat your competition in a search.