How to Set up Google Analytics 4 (GA4)

In our latest blog in our new GA4 series we looked at the advantages of using GA4 and why it is beneficial to set it up now. So, it only made sense for this next blog to provide you with a simple guide to help you work out the best way to set up a GA4 property for your website.
What’s a GA4 Property?
In Google Analytics, a property refers to a website or app which is linked to a unique tracking code. Therefore, as GA4 has a different style of tracking code to Universal Analytics, we need to set up a new property for GA4.
This blog will cover setting up a new GA4 property and the various methods of adding GA4 tracking to your site, depending on how your current Universal Analytics tracking is set up, or if this is your first time setting up Google Analytics.
We have also created a handy flow-chart to help you quickly identify the best way for you to implement GA4 tracking. Once you have followed the flowchart below, you can then go directly to the relevant sections of this blog…

How to set up GA4
- If you do not already have any Google Analytics tracking on your website, your first step will be to go to Google Analytics and create a new account and property for your site. Alternatively, if you already have a Universal Analytics property for this site, navigate to the Admin section and in the Property column, click on ‘GA4 Setup Assistant’. This will set up a parallel GA4 property to run alongside your existing Universal Analytics property.
- Once you have set up a new property for GA4, you want to identify the data stream measurement ID. In the Admin section of your new GA4 property, under the Property column, click on ‘Setup Assistant’.
- Under the Collection heading, click on ‘Tag installation’ and the Data Streams screen will show. If this is a new property, there will not be any streams here, so you need to click ‘Add Stream’, select Web and follow the instructions. . If one is already there, clicking on it will provide web stream details.
- On the Web stream details pop-up, the Measurement ID can be found in the top-right (highlighted in blue in the screenshot below). Copy this ID. You may need it in a later step.

- Here you also have the option to enable or disable Enhanced measurement. We would recommend keeping it enabled. This is also where you have options for how to configure the tagging on your website.
- Use the flow chart in our blog to determine which of the following sections is relevant for you and use our instructions to implement GA4 tags on your site.
How to implement GA4 tags on your site
Add the Global Site Tag directly to your site
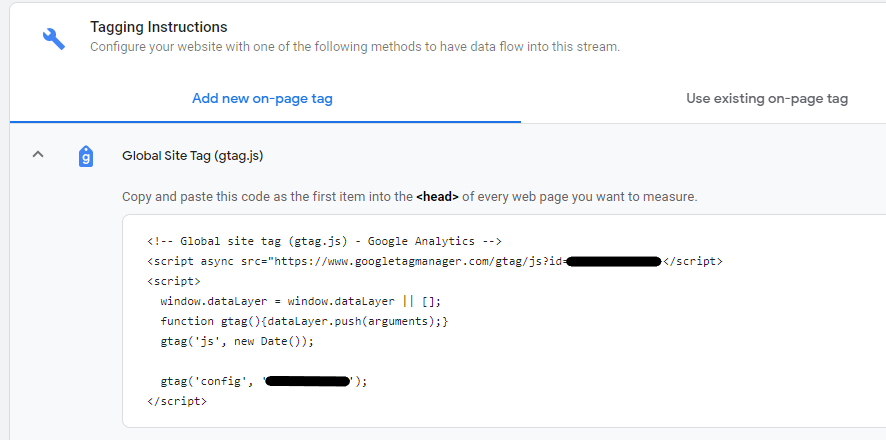
- Under Tagging Instructions, the default tab is Add new on-page tag. If you select Global Site Tag (gtag.js), it will provide code containing your GA4 measurement ID. Copy this code.
- Implement this code as the first item in the <head> of every page of the site that you want to measure through Analytics. Alternatively, you might have a CMS that controls the tracking code area of your site, in which case, add this entire code there.
Create a new GTM GA4 tag
The second option on the ‘Add new on-page tag’ tab is to set up Google Tag Manager.
- If you don’t already have a Google Tag Manager container for this site, go to the Google Tag Manager page and follow the instructions to set up Google Tag Manager and link it to your site.
- If you do already have a GTM container created for this site that controls your existing on-page Google Analytics tag, then you want to follow the instructions under Google Tag Manager in the ‘Use existing on-page tag’ tab. GTM makes it simple to add the new GA4 tracking code to your site.
- Open the existing relevant GTM container (you don’t need to create a new one for GA4), navigate to Tags and add a new tag, giving it a sensible name such as ‘GA4 Tracking’.
- Then click on Tag Configuration and select the ‘Google Analytics: GA4 Configuration’ tag type.
- You then take the Measurement ID that we highlighted earlier, and place this in the corresponding field.
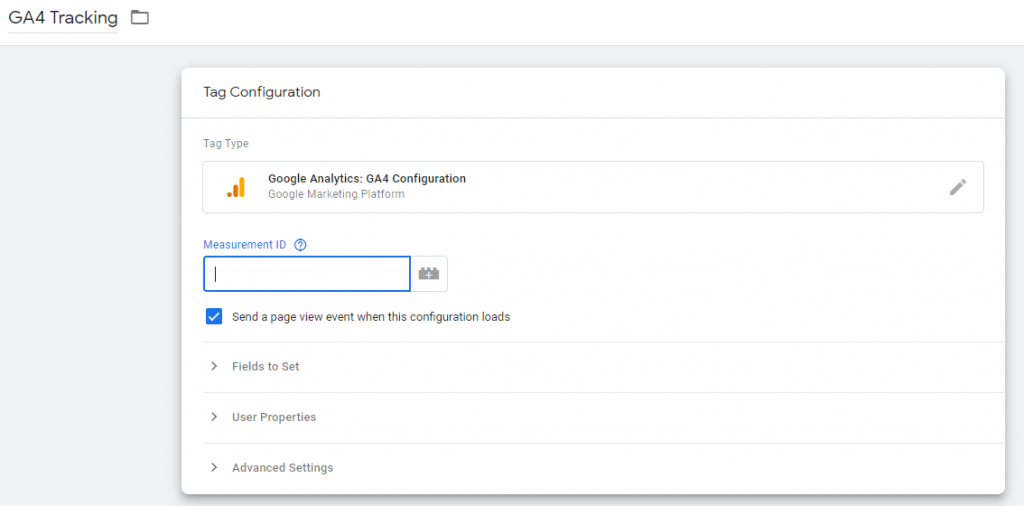
- Select the All Pages trigger and save the tag.
- Submit the changes by publishing the Google Tag Manager container.
Connect to existing Universal Analytics tags
Alternatively, if you already have Universal Analytics added to your site using the standard gtag.js implementation, you can connect your GA4 tracking to these existing tags so that you do not need to set up any GTM tags or add any additional code to your site.
- To add GA4 tracking without changing any code on site, you first need to open your existing Universal Analytics property (must be for the same site) in a new window or tab.
- Then navigate to Admin, then Tracking Info and click on Tracking Code in the expanding list.
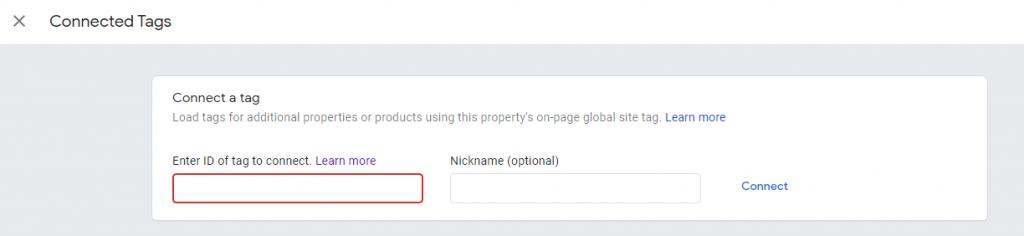
- On this page, below the Global Site Tag section, you will see Connected Site Tags.

- Clicking on this section will take you to the following screen where you enter the GA4 measurement ID (and a Nickname if you wish) and then click Connect.
Check with GA Realtime
Once you have set up your GA4 tracking, you can use the Realtime report to check that it is tracking correctly.
- In your GA4 property, click on Real-time in the left-hand sidebar.
- In a separate tab or window, open your website.
- In the real time report, you should see a new user appear. You can check that it shows a user for your location and displays the correct pages you are looking at. Be aware there might be a slight delay, so you may have to wait a couple of minutes for your user or change of page to display in this report.
- You can also use this report to check if any GA4 event tracking is pulling through.
- If all of this is showing correctly, then Well Done!! You’ve successfully set up GA4 tracking for your site.

If you’re unsure of the best way to set up GA4 for your site and would like some help from the experts at Varn, please do not hesitate to contact our friendly team. We would love to hear from you.